Starting with SF
| SFGui quick reference guide. |
DRAFT
- WARNING: THIS IS SUBJECT TO CHANGE -
HP Laboratories, Bristol
Last revision: 2004-06-24
Summary:
This document is intended to initiate a beginner into the use of SFGui.
Table of contents:
History:
| 04/06/24 | Initial draft published |
Sfgui
Overview
SFGui is a light and simple editor to help in writing and debugging SmartFrog descriptions.
Starting SFGui
To start SFGui the user need to run the command "sfGui". It can be done directly using any file manager or using the shell of the OS. This command is placed in the <SFHOME>\bin\ directory.
The command line for sfGui is: sfGui [filename] [-runAll].
As an optional parameter, it is possible to use the path to the file that should be open automatically after the initialisation of the SFGui. Ex. .\bin\SFGui c:\SmartFrog\sf\Demo1.sf.This would start SFGui with the file Demo1.sf loaded. See Fig.1.
Another optional parameter is “-runAll” when this parameter is present, after the SFGui has been instanciated, all the processes present in the configuration file: \bin\GuiCFG.bat automatically run.
It is not necessary to set up any special variable for the environment but it is possible to do some customisation of the SFGui. To know more about it go to section "Configuring SFGui".
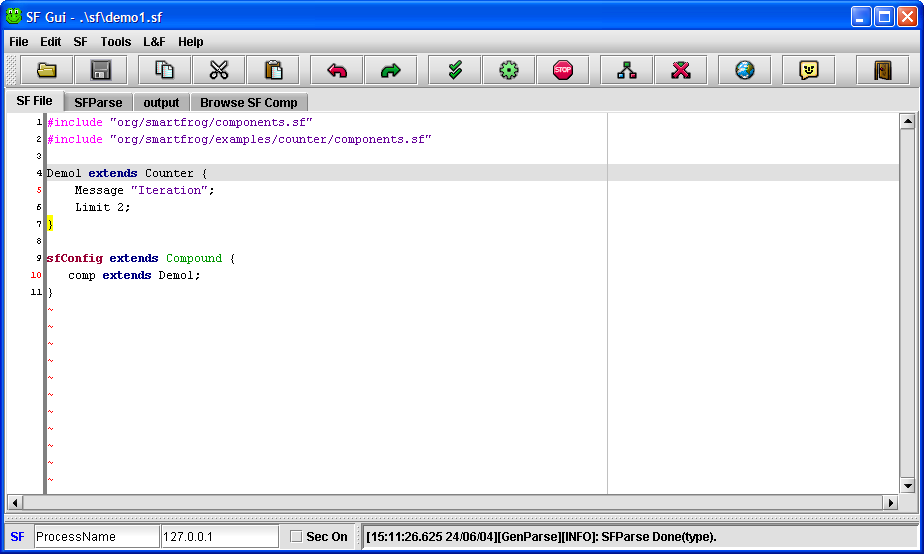
Figure 1 SFGui (Demo1.sf loaded)
Quick tour
This tour is intended to start using SFGui inmediately and get a quick idea about how the system works.
-
Install the distribution files in a directory <directory>.
-
Go to that directory: Ex. cd <directory> .
-
Set the variable SFHOME for this directory:
-
Ex. Linux: export SFHOME=$pwd.
-
Ex. Windows: SET SFHOME=.
-
-
Start SFGui: Ex. SfGui
-
Start and sfDaemon in your local machine. Ex. Push F10 or button with icon
-
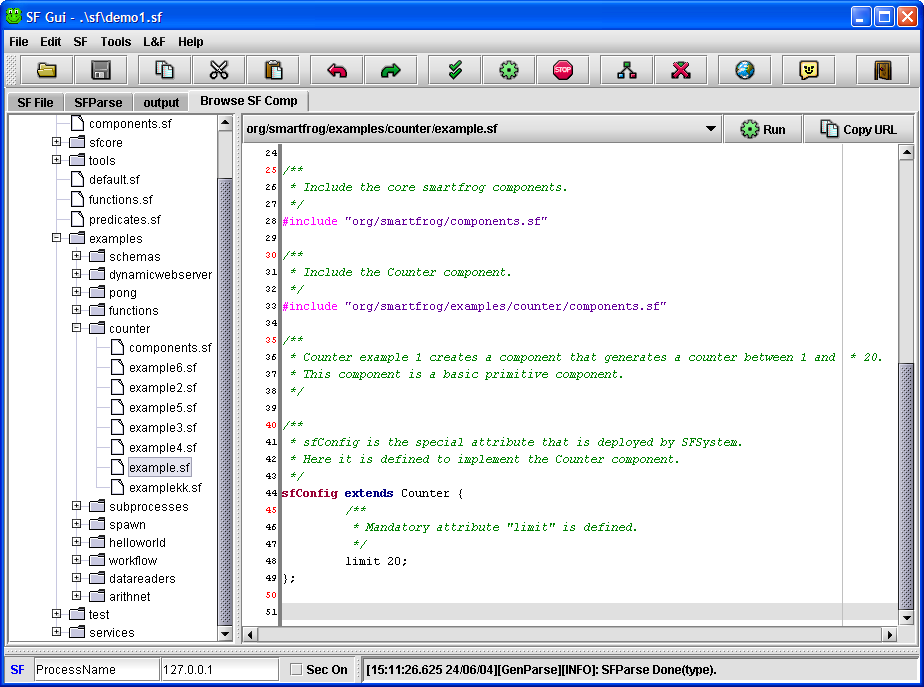
Select “Browse SF Comp” tab.
-
Select in the file: “org\smartfrog\examples\counter\example.sf” in the combo box or in the tree.
-
Push the button “ Run” in the left of the combo box.
-
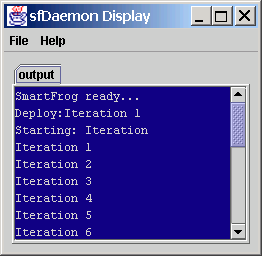
Now you have a SmarFrog system up and running!.
Using SFGui
The main screen is divided in two main areas and each of one contains a tabbed panel that give access to other sub areas.
The north area it is composed by a tool bar and a panel that contains all the actions that manipulate SmartFrog files (.sf).
The south area it is dedicated to show resume messages about what it is happening in the whole system and to manage processes spawned by the system. By default this are is hidden.
To enable the south panel press: CRTL+ALT+M or select L&F->Show Msg. P.
North panel
It is the area dedicated to create, edit, verify, debug and execute SmartFrog files. It has as well an area where the output of all the spawned processes is redirected and a Tool Bar that includes the most used options to manipulate a SmartFrog file.
SF File Tab
This is the tab contains the editor for SmartFrog Files. It offers coloured syntax and brackets highlights to make easier the creation and modification of this type of files. It also contains the file that is used with the operations contained in the main tool bar.
See Fig. 1.
Main Tool Bar
Figure 2 Main Tool Bar.
This is the bar placed at the top of the SFGui frame when this is first started. This tool bar can be placed in different parts of the screen or it can be made floatable.
The buttons of this tool bar provide direct access to some of the common operations available to use with SmartFrog files. All the operations contained in this bar are related to the file contained in the editor of SF File Tab which path is shown at the top of the SFGui frame.
Operations available:
-
Loads a file in the Editor.
-
Saves the file hold in the Editor.
-
Copies the text highlighted in the editor to the Clipboard.
-
Cuts the text highlighted in the editor to the Clipboard.
-
Pastes the text contained in the Clipboard into the Editor.
-
Undoes the last operation done in the editor.
-
Redoes the last operation undone in the editor.
-
Applies he standard parse operations to the file contained in the Editor. See Parse in next section.
-
Runs the files contained in the Editor. See Run in next section.
-
Tries to stop the process pointed for the parameters contained in the status bar. See Stop in next section.
-
Starts the SmartFrog Daemon with the default ".ini" and ".sf" files. If a daemon is already started then the SFGui kills the previous one and starts a new one.
-
Starts a browser with the initial URL indicated in the configuration file of SFGui.
-
Opens help for SFGui and SmartFrog.
-
Exit.
SF Parse Tab
The parse panel shows the results of the different parsing phases applied to the file contain in the Editor in response to the main menu command or its equivalent button in the main tool bar.
The panel shows the raw, advance parser and deploy tabs. In the advanced panel the user can select each one of the available parsing phases for a particular SmartFrog description.
For more information about he parser check the SmartFrog reference manual.
The standard parsing phases shown by default are:
-
Raw: This shows the description with all includes resolved..
-
Deployment: This shows the final system to be deployed.
If the parser encounters a problem, only the successful phases will be shown.
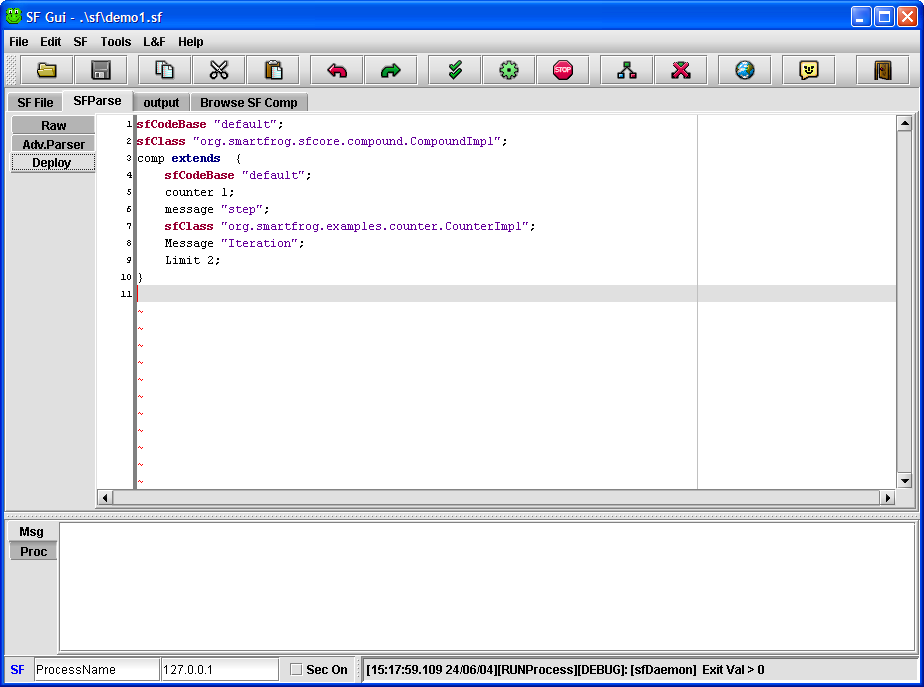
Figure 3 SFGui Parse Deploy phase (Demo1.sf loaded)
With the advanced parsing panel it is possible to select any of the available phases for a particular SmartFrog description. Before a phase can be selected it is necessary to load the phases assign to the SmartFrog file being edited by pressing the button "Load Phases". Once the phases are loaded, the list is available on the left of that button.
Every time phase is selected the result is shown in the editor just beneath the list.
After making changes in the edited file is possible to reapply the select phase with the use of the button "Parse". Placed on the left of the "Load Phases" button.
It is also possible to copy highlighted text from the editor to the Clipboard using the button "Copy Text".
In the figure 4 it is possible to observe the different parsing phases that are applied to the file Demo1.sf.
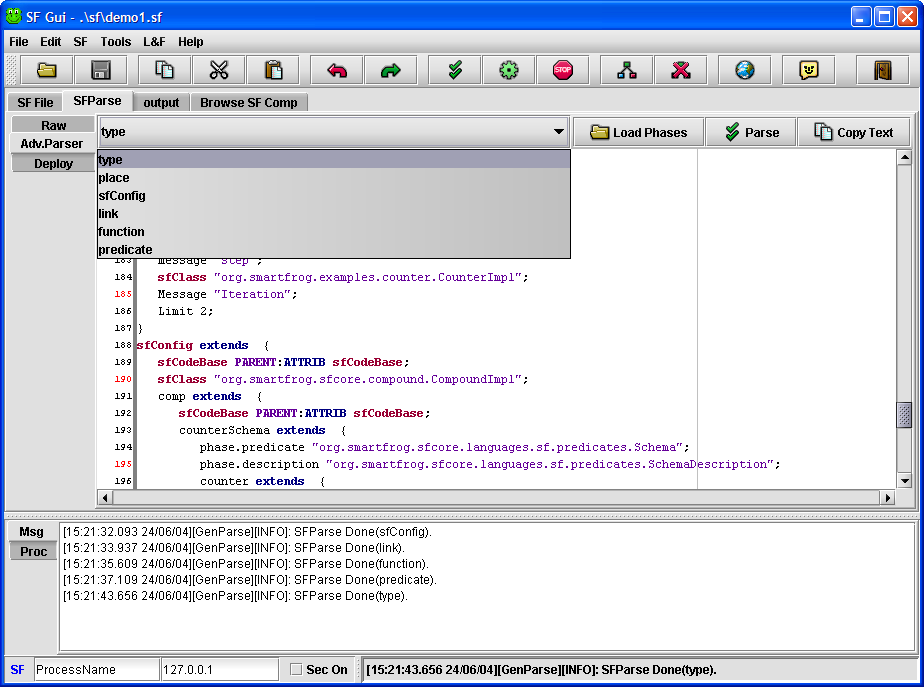
Figure 4 SFGui Advanced Parser.
When the parsing is done a message is posted in the messages panel indicating the phase done and if the result was successful. If during the parsing an error was encountered, a resumed message will be posted in the messages panel and more detailed information about it will be posted in the output panel.
Output Tab
The output panel is where all the output produced by any spawned process is shown. It is as well where all the extensive information about debugging and error is dumped. A resumed version of this errors or debug information it is posted in the messages panel as well.
All the contents of the output panel can be stored in disc using the option "Tools/Save Output…" in the main menu. If it is necessary, it is also possible to clean the content of this panel using the option "Tools/Clean Output" of the main menu.
Browse SF Components Tab
This panel gives access to all the ".sf" files that are available to the SFGui in its classpath. With this panel it is possible to browse through all the SmartFrog descriptions and to copy their "urls" as includes to add them to the file being edited or to copy areas of text that are interesting for the user.
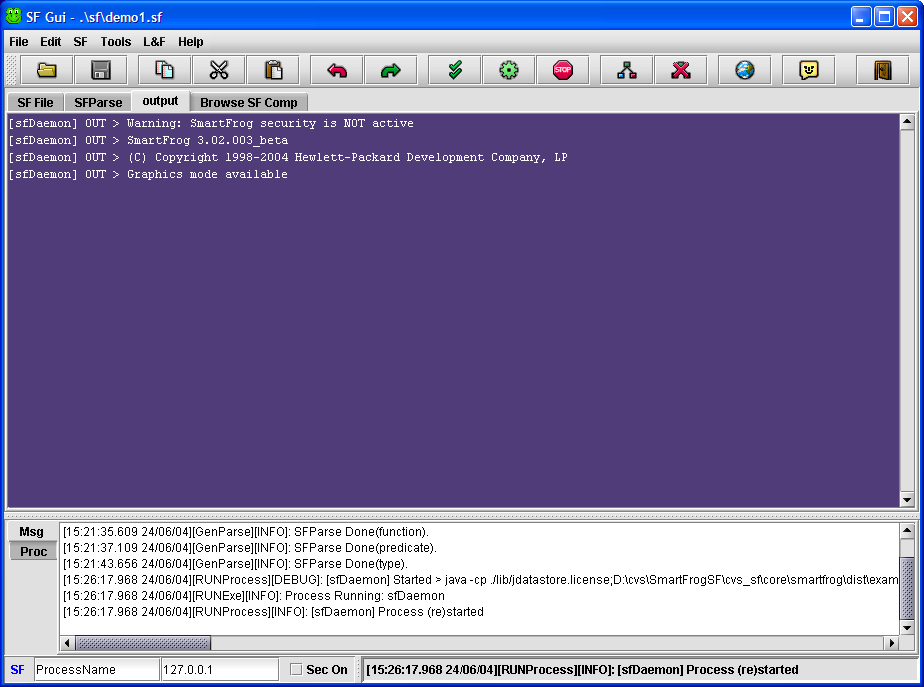
Figure 5 SFGui Output Tab selected (sfDaemon started)
At the top of the panel are placed the different operations that we can do in this panel.
The first one on the left is an extensible list shows all the available ".sf" files. Selecting one of them will result in its content shown in the editor placed beneath the selection list.
Pushing the button "RUN" and if the selected file contains an "sfConfig" defined (see SmartFrog manual), SFGui will try to create and start a process that will "run" it. The process created will be automatically added to the process manager. The name used for the process will be the one typed in the first box of the status bar at the bottom of the SFGui frame (See figure 12), in the screen shot example: "ProcessName". It will be deployed in the machine address typed in the second box (in the screenshot example: "127.0.0.1"). The name used to add the process to the process manager will be composition of both to distinguish between instances of the same process deployed in different machines (for the example process would be: "ProcessName(127.0.0.1)"). See figure 6.
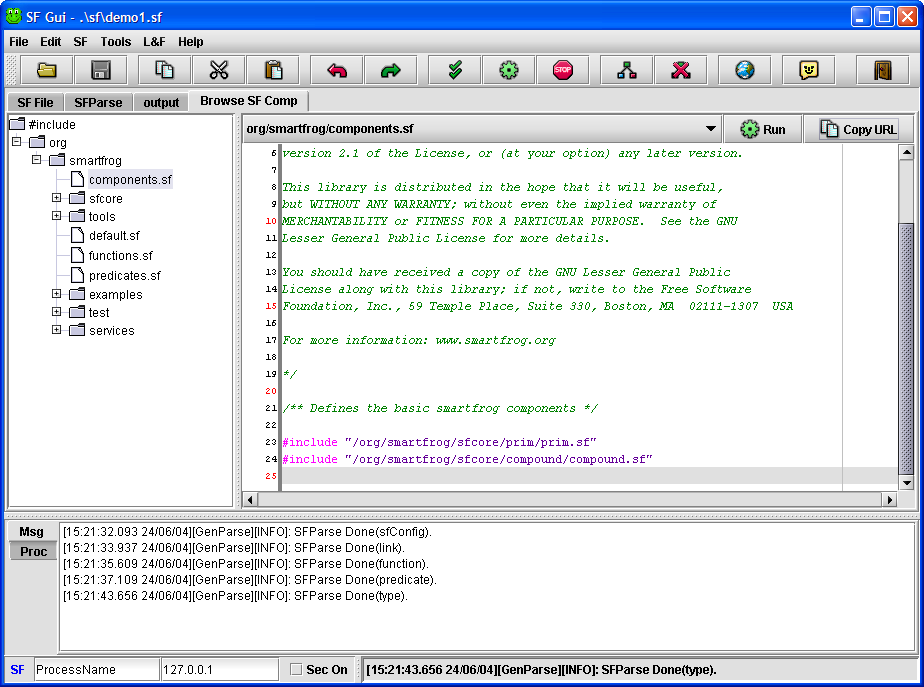
Figure 6 SFGui Browse SF Components selected.
The button Copy URL will copy the "URL" of the selected file to the Clipboard adding as a prefix "#include ".
The button Copy text will copy the highlighted text in the selected file to the Clipboard.
South panel
To enable the south panel press: CRTL+ALT+M or select L&F->Show Msg. P.
Messages Tab
In the Messages panel is posted all the relevant information about the actions taken places in the SFGui. Each of these messages is logged with its date and some extra information to better understand what is happening.
[01:55:16.767 11/12/01][RUNExe][INFO]: Process Running: sfDaemon
[01:55:16.797 11/12/01][RUNProcess][DEBUG]: [sfDaemon] Started > java -cp ./Examples;. lib\smartfrog.jar; -Dcom.h…
[01:55:16.817 11/12/01][RUNProcess][INFO]: [sfDaemon] Process (re)started
The last message posted in the Messages panel it is always posted in the status bar as well (at the bottom of the SFGui frame).
If it is necessary, it is also possible to clean the content of this panel using the option "Tools/Clean Output" of the main menu.
Process Manager Tab

Figure 7 Process Manager.
Operations available:
-
Runs the process selected in the processes list. See Run in next section.
-
Tries to stop the process selected in the processes list. If the process has an stop command it will used. If the stop command fails or it does exits, it will kill the process directly.
-
Kills the process selected in the processes list.
-
Starts all process contained in the list of processes. The first one is the one named sfDaemon (if it exists) and the rest.
-
Kills all process that are in the list. The last one will be the one named sfDaemon (if it exists).
-
Adds process to list. The process is created in the process manager using the name typed in the Process box. The start command is the one typed in the box Command. There is no stop command for it. See following figure.

Figure 8 Process description bar in Process Manager.
-
Deletes process from list.
-
Refresh list of processes.
-
Loads up to 10 processes from the configuration file "sfGuiCFG.bat".
-
Saves all list of processes to the configuration file "sfGuiCFG.bat".
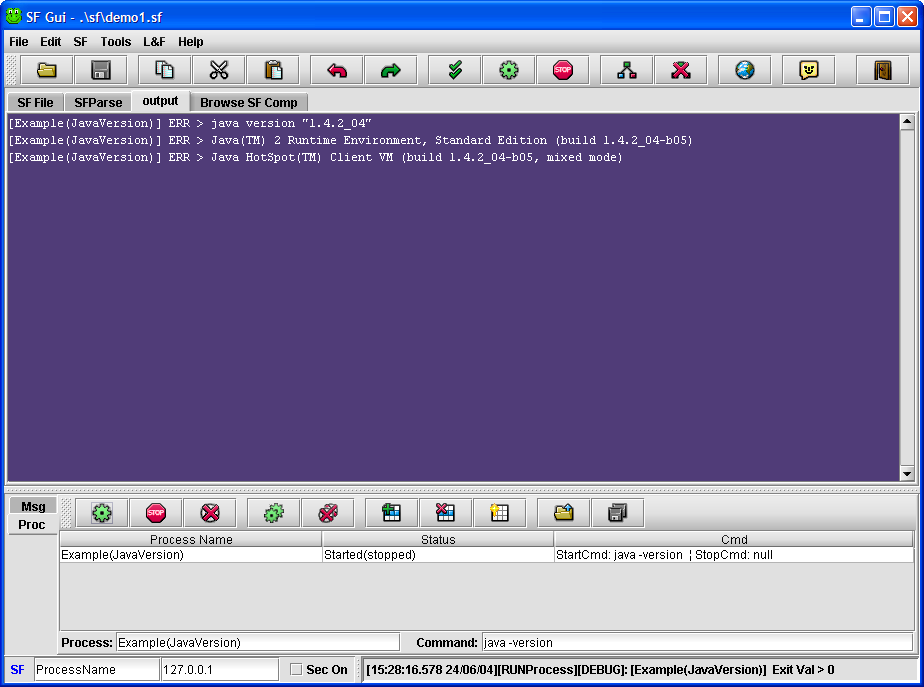
Figure 9 SFGui after running "JavaVersion" process with its output.
Note:
The process manager uses the files stored in disc so when using the process manager it is not necessary to have the file that you want to test loaded in the editor.
Main Menu
Figure 10 Main Menu.
The Editor is contained in the SF File Tab.
File
-
New: Creates a new file in the Editor.
-
Open: Loads a file in the Editor.
-
Save: Saves the file hold in the Editor.
-
Save As: Saves the file hold in the Editor but the user has to give it a name first.
-
Exit: Abandons the SFGui. It can be invoked directly with the combination of keys: alt+F4.
Edit
-
Undo: Undoes the last operation done in the editor. It can be invoked directly with the combination of keys: crtl+shift+z.
-
Redo: Redoes the last operation undone in the editor. It can be invoked directly with the combination of keys: crtl+shift+z.
-
Copy: Copies the text highlighted in the editor to the Clipboard. It can be invoked directly with the combination of keys: crtl+c.
-
Cut: Cuts the text highlighted in the editor to the Clipboard. It can be invoked directly with the combination of keys: crtl+x.
-
Paste: Pastes the text contained in the Clipboard into the Editor. It can be invoked directly with the combination of keys: crtl+v.
-
Select all: Highlights the whole doc of the Editor.
-
Search...: Brings up a dialogue box to select the text to be searched in the selected editor panel. It can be invoked directly with the combination of keys: crtl+f.
-
Search next: Repeats the last search in the selected panel for the actual cursor position. It can be invoked directly with the key: F3.
SF
-
Parse: Applies the standard parse operations (raw, type resolution, placement and deployment) to the file contained in the Editor showing the results in different panels and automatically selects the Parse Tab if the operation was successful. If an error was found a message will be posted in the messages panel and the whole parser output will be posted in the output panel. It is also possible to see in the parse panel the last successfully parsed phase before encountering the bug. It can be invoked directly with the combination of keys: alt+s. It also post messages in the messages panel referring to the status of the parsing. For more information about the parsing check the SmartFrog manual.
Figure 11 Messages obtained after a succesful parse action.
-
Run: Runs the files contained in the Editor. The process created is automatically added to the process manager panel so that it can be reused from there in the future. The process manager uses the files stored in disc so when using the process manager it is not necessary to have the file loaded in the editor. The process is created using the start command specified in the configuration file. (see "Configuring SFGui" section). The name used for the process will be the one typed in the first box of the status bar at the bottom of the SFGui frame(in the screen shot example: "ProcessName"). It will be deployed in the machine address typed in the second box (in the screenshot example: "127.0.0.1"). The name used to add the process to the process manager will be composition of both to distinguish between instances of the same process deployed in different machines (for the example process would be: "ProcessName(127.0.0.1)"). If the "Sec On" is ticket the suffix indicated in the configuration file of SFGui will be added to the normal start command (the default subfix is S). This will allow running specialized batch files with security enabled. It can be invoked directly with the combination of keys: alt+r.

Figure 12 SFGui Status bar.
-
Stop: Tries to stop the process pointed for the parameters contained in the status bar. The name used for the process will be the one typed in the first box of the status bar at the bottom of the SFGui frame (in the screen shot example: "ProcessName"). It will be searched in the machine address typed in the second box (in the screenshot example: "127.0.0.1"). If the "Sec On" is ticket the subfix indicated in the configuration file of SFGui will be added to the normal start command (the default suffix is S). This will allow running specialized batch files to enable security in the system. It can be invoked directly with the combination of keys: alt+s.
-
SfDaemon: Starts the SmartFrog Daemon with the default ini and sf files. If a daemon is already started then the SFGui kills the previous one an starts a new one. It can be invoked directly with the key: F11.
-
Stop sfDaemon: Stops the SmartFrog Daemon . It can be invoked directly with the key: F12.
-
Browse: Starts a browser with the initial URL indicated in the configuration file of SFGui.
Tools
-
Clean Output: Cleans the output area but giving the opportunity to save its content to a file.
-
Clean Msg: Cleans the messages area.
-
Save Output …: Saves the content of the output area.
Look & Feel
Allows to select between different looks and feel for the SFGui.
-
Auto
-
Metal
-
Windows
-
Motif
-
Kunstoff
Help
-
Info
Dumps the content of a selected group of properties of the system. Example:
*****************************************************
* @ Serrano - HP Labs Bristol - 2001 *
*****************************************************
Java Version: 1.3.1_01
Java Home: D:\Program Files\JavaSoft\JRE\1.3.1
Java Ext Dir: D:\Program Files\JavaSoft\JRE\1.3.1\lib\ext
Java ClassPath: ./Examples;E:\SFGui\lib\smartfrog.jar;E:\SFGui\lib\sfTools.jar;E:\SFGui\lib\sfslp…
OS Name: Windows 2000
OS Version: 5.0
User Name: julgui
User Home: D:\Documents and Settings\serrano
User Work Dir: E:\SFGui
Smart Frog: 2.0beta
LocalHost Name: serrano-demo-1
LocalHost IP: 14.48.181.68
isMulticast? false
-
Info Prop.
Dumps the content of all the properties of the system. Example:
**************************************************
Info Properties:
* java.runtime.name: Java(TM) 2 Runtime Environment, Standard Edition
* sun.boot.library.path: D:\Program Files\JavaSoft\JRE\1.3.1\bin
* java.vm.version: 1.3.1_01
* java.vm.vendor: Sun Microsystems Inc.
* java.vendor.url: http://java.sun.com/
* path.separator: ;
* java.vm.name: Java HotSpot(TM) Client VM
* file.encoding.pkg: sun.io
* java.vm.specification.name: Java Virtual Machine Specification
* user.dir: E:\SFGui
* java.runtime.version: 1.3.1_01
* java.awt.graphicsenv: sun.awt.Win32GraphicsEnvironment
* os.arch: x86
* java.io.tmpdir: D:\DOCUME~1\serrano\LOCALS~1\Temp\
* line.separator:
* java.vm.specification.vendor: Sun Microsystems Inc.
* java.awt.fonts:
* os.name: Windows 2000
* java.library.path: D:\WIN2000\system32;.;D:\WIN2000\System32;D:\WIN2000;D:\WIN2…
* java.specification.name: Java Platform API Specification
* java.class.version: 47.0
* os.version: 5.0
* user.home: D:\Documents and Settings\serrano
* user.timezone: Europe/Paris
* java.awt.printerjob: sun.awt.windows.WPrinterJob
* file.encoding: Cp1252
* java.specification.version: 1.3
* java.class.path: ./Examples;./Examples; E:\SFGui\lib\smartfrog.jar;E:\SFGui\lib\s…
* user.name: serano
* java.vm.specification.version: 1.0
* java.home: D:\Program Files\JavaSoft\JRE\1.3.1
* user.language: en
* java.specification.vendor: Sun Microsystems Inc.
* awt.toolkit: sun.awt.windows.WToolkit
* java.vm.info: mixed mode
* java.version: 1.3.1_01
* java.ext.dirs: D:\Program Files\JavaSoft\JRE\1.3.1\lib\ext
* sun.boot.class.path: D:\Program Files\JavaSoft\JRE\1.3.1\lib\rt.jar;D:\Program…
* java.vendor: Sun Microsystems Inc.
* file.separator: \
* java.vendor.url.bug: http://java.sun.com/cgi-bin/bugreport.cgi
* sun.io.unicode.encoding: UnicodeLittle
* sun.cpu.endian: little
* user.region: GB
* sun.cpu.isalist: pentium i486 i386
**************************************************
-
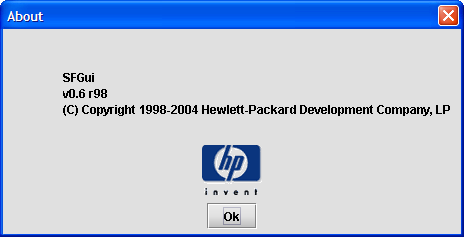
About: Shows the "About" dialog box. See example:
Configuring SFGui
All the parameters that can be used to adapt SFGui to a particular situation are contained in the file: "sfGuiCFG.bat" paced in <SFHOME>\bin.
The process manager panel stores its list of processes in this file as well.
Environment variables
For Windows platforms:
The variables that the user can change/add to customize SFGui to his own development environment are:
rem ----To customize for each particular user ---------
rem set SFHOME=xxxx rem your particular Serrano Framework
rem set JAVA_HOME=c:\java\jdk1.3
rem set srcDir=./Examples
rem ---------------------------------------------------
-
rem set SFHOME: This variable gives the user the opportunity to explicitly point to their own distribution of SmartFrog or using it the user can avoid to define SFHOME as an environment variable. To enable it the user needs to remove the rem before the se. Ex: set SFHOME=c:\SmartFrog
-
rem set JAVA_HOME: This variable gives the user the opportunity to use a particular JDK. To enable it the user needs to remove the rem before the set. Ex: set JAVA_HOME=c:\java\jdk1.3
-
rem set srcDir: Modifying this variable the user can add his own directories to the paths used by SFGui. To enable it the user needs to remove the rem before the set. Ex: set srcDir =./Examples
Configuration Parameters
All the configuration parameters are placed under the section tagged:
rem [SFGuiConfig].
The values shown in the examples are the default values.
rem -----------------Config parameters for SFGui---------
rem [SFGuiConfig]
rem sfFilesDir=./sf
rem SFSystemClass=org.smartfrog.SFSystem
rem cmdSFDaemon=-Dorg.smartfrog.sfcore.processcompound.sfProcessName=
rem SFDaemonProcessName=rootProcess
rem SFDaemonDefIniFile=./bin/default.ini
rem SFDaemonDefSFFile=./bin/default.sf
rem cmdSFStart=sfStart
rem cmdSFStop=sfTerminate
rem suffixSecureScrip=security
rem cmdBrowserURL=http://127.0.0.1:4242/
rem cmdBrowserWin=explorer
rem cmdBrowserLinux=netscape
rem lookAndFeel=kunststoff
rem -----------------------------------------------------
-
rem sfFilesDir: Directory where to look for .sf files. The first time the user selects to open a file, the dialog to open the file will be pointing to the directory specified in this parameter.
-
rem SFSystemClass: Main class to start the SF system.
-
rem cmdSFDaemon: Java property needed to load a SmartFrog Daemon.
-
rem SFDaemonProcessName: Name used to start a SmartFrog Daemon.
-
rem SFDaemonDefIniFile: Default configuration file for a SmartFrog Daemon.
-
rem SFDaemonDefSFFile: Default .sf file for a SmartFrog Daemon.
-
rem cmdSFStart: Command to start a process in SmartFrog.
-
rem cmdSFStop: Command to stop a process in SmartFrog.
-
rem suffixSecureScrip: Suffix added to the start and stop commands when SmartFrog is using security. This prefix is automatically added with the user executes a .sf files and the option "sec on" placed in the status bar at the bottom of the SFGui frame is ticked.
-
rem cmdBrowserURL: URL used to start the browser when it is launched using the SFGui button in the tools bar.
-
rem cmdBrowserWin: Command to start a browser in Windows OS.
-
rem cmdBrowserLinux: Command to start a browser in Unix OS.
Processes list
The list of processes stored by the process manager is places under the section tagged: rem [Processes]
The information stored about each process is structured in the following way:
rem [Processes]
rem processName0=
rem processCmdStart0=
rem processCmdStop0=
rem processName1=Demo1(localhost)
rem processCmdStart1=cmd.exe /C .\bin\sfStart localhost Demo1 .\sf\Demo1.sf
rem processCmdStop1=cmd.exe /C .\bin\sfStop localhost Demo1
rem processName2=
rem processCmdStart2=
rem processCmdStop2=
…
rem processName9=
rem processCmdStart9=
rem processCmdStop9=
(more can be stored, but only from 0 to 9 will be loaded by SFGui)
When stored, each of the processes receives a number according with their position in the processes table.
The number of processes stored by the process manager is unlimited, but it will only read the processes numbered from 0 to 9.
An example process will look like:
rem processName1=Demo1(localhost)
rem processCmdStart1=cmd.exe /C .\bin\sfStart localhost Demo1 .\sf\Demo1.sf
rem processCmdStop1=cmd.exe /C .\bin\sfStop localhost Demo1
The information stored/loaded for each process is:
-
rem processName#: Name of the process in the Process manager. Ex: Demo1(localhost)
-
rem processCmdStart#: Command line needed to start the process. Ex: "cmd.exe /C .\bin\sfStart localhost Demo1 .\sf\Demo1.sf".
-
rem processCmdStop#: Command line needed to stop the process. Ex: "cmd.exe /C .\bin\sfTerminate localhost Demo1". If no stop command is provided the process will be killed instead when that action is requested.
Note: The use of spaces inside paths it is not recommended.

